Windows 7 to Windows 10 upgrade
Information, survey and instructions on how to upgrade to the Windows 10 operating system.
There are a number of computers at the University that are currently operating on Windows 7 and need to be upgraded to Windows 10. While some of these machines are due to be replaced, others will need to be upgraded as Microsoft will cease to support Windows 7 in the coming months.
In cases where the computer is due to be replaced you will not be contacted to upgrade your machine to Windows 10.
If your computer needs to be upgraded from Windows 7 to 10 and is not being replaced, you can expect to receive an email requesting you to commence this process when convenient.
Important note
Standard devices connected to your computer such as regular printers, USB memory sticks and headsets should not be affected by the upgrade. If you have any specialist or non-standard devices connected, the technology team need to know to ensure there aren't any compatibility issues with Windows.
If you'd like to inform the technology team of any reason why your computer should not be upgraded to Windows 10, please complete the Windows Upgrade Survey.
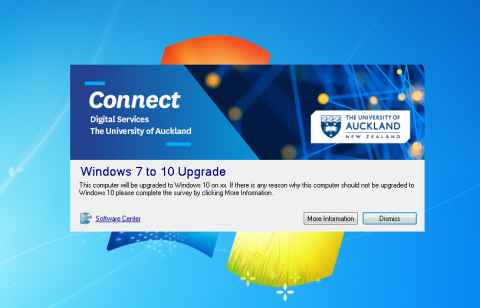
If the upgrade to Windows 10 is not completed, it will be automatically deployed to your computer. You will see a series of pop-up messages counting down to alert you to the impending upgrade:
Self-upgrade to Windows 10 guide
General tips
- The process to upgrade to Windows 10 takes a couple of hours, and you will not be able to use your computer during this period. It is recommended that you start the upgrade at the end of the day, before you leave the office.
- This is an in-place upgrade that you can do yourself at a time convenient to you to shut down the computer. When the upgrade is running, it will restart the upgrade when the machine is next turned on
- The first time you log in once Windows 10 has been installed, it will take 30 minutes for the upgrade process to be completed
Laptop users please note
- You must be on- campus to do the upgrade- do not try to do the upgrade when off site.
- Your laptop needs to be connected to the network as this upgrade is not possible when connected to WiFi
- Ensure your laptop is plugged into a power source before you initiate the upgrade to Windows 10
You will have access to the latest version of Microsoft Office once the upgrade has been completed.
After the upgrade
Upgrade old software
As your computer hasn't been updated for years you may be running versions of application software that are out of date and may not run optimally with Windows 10.
You can easily upgrade most software applications yourself by going back into Software Centre and choosing the application you want to update.
If the software application is not available in Software Centre please log a request for it to be updated on your computer by following the steps for requesting software or applications not listed in the Software Centre.
Logging in to Office 365
Your computer has also been upgraded to Microsoft Office 365. This works the same as if you currently use Office 365 at home.
You will need to log in to Office 365.
Training guides available at the Office 365 Training Centre.
Frequently asked questions
I'm running Windows 7 but I can't see the "Upgrade to Windows 10" in Software Center
We have done a lot of analysis of the Windows 7 computers. If you don't have the ability to do a self-upgrade is likely to be one of these main reasons:
- Your computer is due to be physically replaced before the end of Q1 2020 (in which case we are working through replacing these - you will be contacted closer to the time)
- Either yourself, a colleague or an IT technician has identified that your computer needs further investigation to ensure that the software and any connected devices will continue to work on Windows 10
Windows 7 to 10 upgrade instructions
-
Windows 7 to 10 upgrade instructions. Size: 507.3 kB.
Document Description: Self-upgrade guide printable.
1. Software Centre
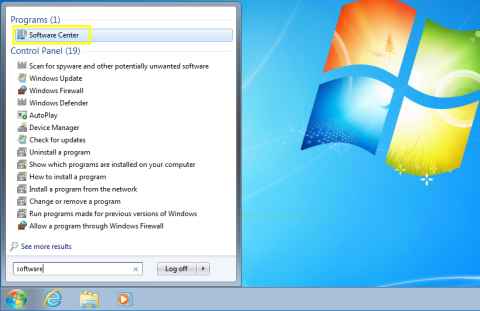
Go to the Windows Start button in the bottom left of your screen.
In the Search programs and files box and type Software.
Click on Software Centre.
2. Find Windows 10 software
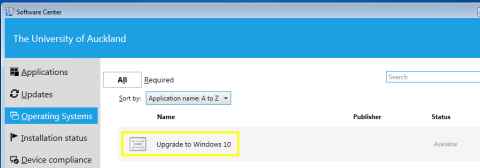
Under Operating systems you will see the option to upgrade to Windows 10
3. Select Windows 10 software
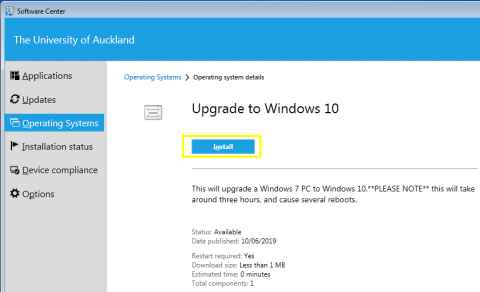
Click Install.
4. Installation process
This is your last chance to cancel and do the upgrade at another time.
If you want to upgrade now, click Install.
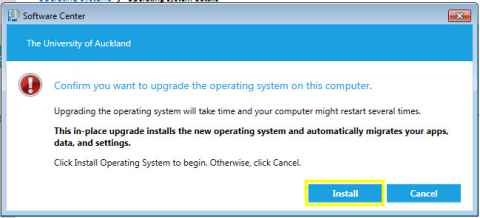
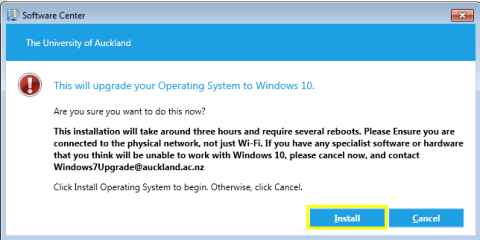
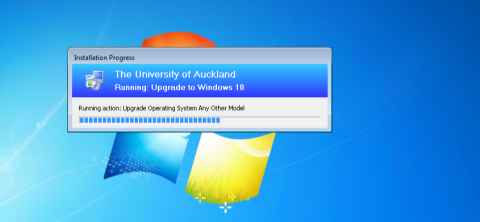
You will see a variety of progress messages over the next 3 hours and your computer will restart automatically many times during the process of installing Windows 10.
It is critical that you don’t interrupt the installation, turn your computer off or try and break out of the upgrade process as this will leave your computer in an unusable state.
Any restarts will count down and not require you to press any button.
5. Windows 10 installation complete
When the upgrade has been completed you will see a screen similar to this.

Press CTRL ALT and DEL keys to login as usual. Enter your usual username and password.
Contact us
If you have any questions, please email the project team: windows7upgrade@auckland.ac.nz