Using Google Takeout to move your files and photos
How to move your Google files from your University Google Drive using Google Takeout
Important Information
1. Delete files you don't need
- Make sure you've deleted files you don't need using these instructions
2. Make sure you copy any files shared with you
Google TakeOut won't copy files that have been shared with you. If you want to copy them:
- Create a new folder in your Google Drive to move all your shared items into
- Go to "Shared with Me" and add all the shared items from there to the new folder in your drive
3. Transfer any Google Photos
We recommend transferring any Google Photos as a separate Google TakeOut job to keep them separate and easier to manage. Follow these instructions to transfer Google Photos.
4. Use Google TakeOut to download your files
Google TakeOut can be used to export your contents of Drive
- Go to https://takeout.google.com
- Sign in using your @aucklanduni.ac.nz address and usual password
- Under 1. Select data to include, click the blue Deselect all link
- Put a tick in Drive.
- If you don't want to migrate all folders, then click on the All drive data included button. Remove the tick from Include all files and folders in Drive, click Deselect all and select the individual folders to export then click OK. If you have files that have been shared with you, make sure you select the folder you created in the step above
- Scroll to the bottom of the screen and click Next step
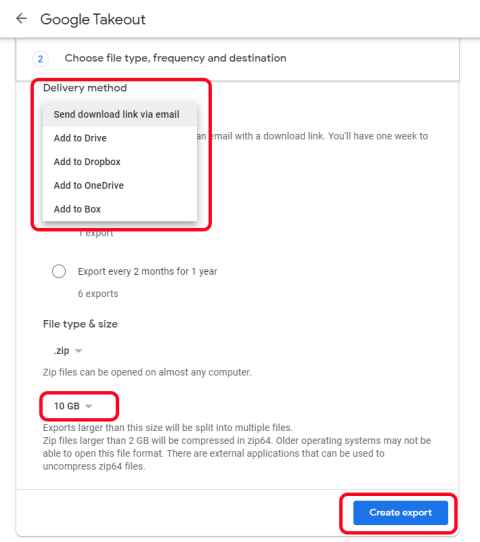
- Choose the Delivery method (normally this is send download link via email). Note that Add to OneDrive will not add to OneDrive for Business (the University's OneDrive)
- Change the file type and size to 10 GB.
- Click Create Export

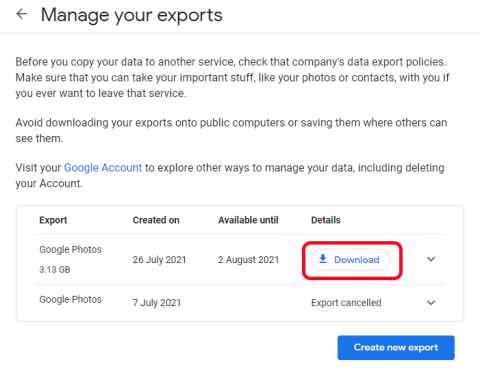
A zip file will now be created that you can open on your computer. This may take up to 3 days. Once it's been created you will be emailed at your @aucklanduni.ac.nz email address.
Click on the download link.

4. Extract the files from the zip file
- Open the zip file(s) and extract them to folders on your computer
5. Check your files are OK
Where to find your files
All content will be copied into a folder labelled with your University account name and the date you initiated the copy process.
What WILL be Transferred
- Files in Folders in Google Drive that are OWNED by you
- Shared files that have been “Added to Drive” (Step 2 on this page) will be copied but the new file will NOT be shared with collaborators
What will NOT Transfer
- Images stored under “Google Photos”
- “Shared with Me” Files that have NOT been “Added to Drive”Google Sites, Google Forms, Google MyMaps & other third- party content in Drive
6. Copy the files to your new service
Once you have unzipped the file you can now copy the files to your new service. Instructions will be different for each. Your University OneDrive is only available to you while you are affiliated with the University so is not a good location for your personal photos.
7. Delete the old files
Google TakeOut copies your files - it doesn't move them. Once you have checked and are happy that you have all the files you need please remove the originals from your University Google Drive.
Note that Google uses the terms Bin and Trash to mean the same thing - on your device it may show Trash rather than Bin.
To remove files and folders in Google
- Highlight the file or folder
- Right-click and select Remove
- Click Move to bin
- Delete the folders and zip files from your local computer
I’ve accidentally deleted folders from Google Drive, how do I get them back?
- Go to Bin (or Trash) on the left-hand side
- Highlight the folder or file to restore, Right-click
and select Restore